
How to Add Google Analytics 4 to WordPress Without a Plugin
You’ve got a blog. You’re writing posts. And you’ve got no clue which ones anyone actually reads. That’s what Google Analytics is for.
The usual advice is “install a plugin.” Fine, but you really don’t have to. Your site only needs one small piece of code, and you can add it yourself in about fifteen minutes. Here’s how to add Google Analytics 4 to WordPress without a plugin, plus how to check it’s working and what to do when it isn’t.
Table of Contents
Plugin or No Plugin?
Honest answer: either works.
Google’s own Site Kit plugin is free and easy, and it shows your stats inside the dashboard. Lots of people like that. But it’s one more plugin to update, and if all you want is the tracking, you’re loading a lot of extras you’ll never touch.
Doing it by hand means a few lines of code and nothing more to maintain. That’s the route I’ll show. If code makes you nervous, take the plugin route and carry on. No shame in that.
Before You Start
Three things first.
You need a Google account, and a Google Analytics account you can sign in to. A free one is fine.
You should take a backup. You’ll be editing a theme file, and a typo can break the site. It takes two minutes. Do it.
And use a child theme. If you paste code straight into your main theme’s functions.php, the next theme update will wipe it out, and your tracking will quietly stop. If you’re not sure how, our guide on how to add JavaScript to WordPress without a plugin covers the safe habits, like using a child theme.
Step 1: Create Your GA4 Property
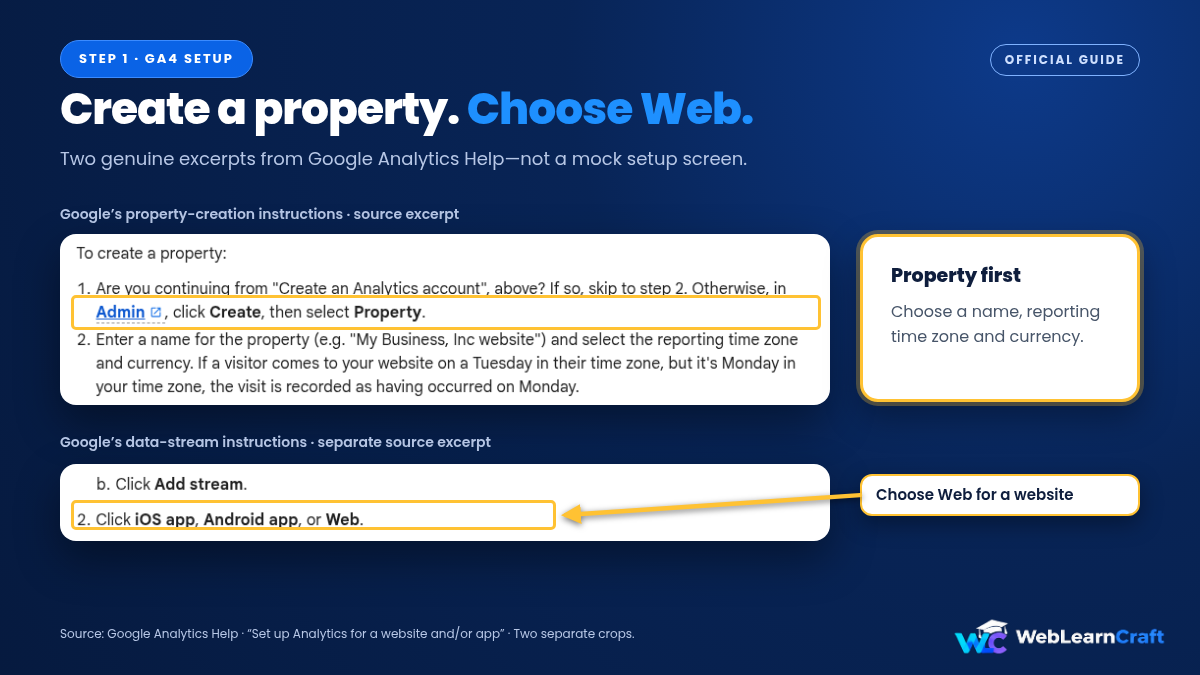
Sign in to Google Analytics. Click Admin (the little gear at the bottom left), and create a new property. Give it a name, set your time zone and currency, and click through the questions about your business. Answer them honestly, but don’t overthink it.
Next, you need a data stream. This is the bit that connects Analytics to your website. Choose Web, type in your site’s address, and name the stream. Then click Create stream.
Google may switch on “enhanced measurement” by default, which tracks things like scrolls and outbound clicks. Leave it on if you’re not sure. You can adjust it later.
Done? You’ve just created the place where your data will land. Now you need the code that sends it.
Step 2: Find Your Measurement ID
Google gives every web stream a Measurement ID. It starts with G- followed by letters and numbers, something like G-ABC123XYZ. This ID identifies the web data stream that should receive your site’s data.
You’ll see it in the stream details, right after you create the stream. Missed it? Go to Admin, then Data streams, click your web stream, and it’s there at the top right. Copy it.

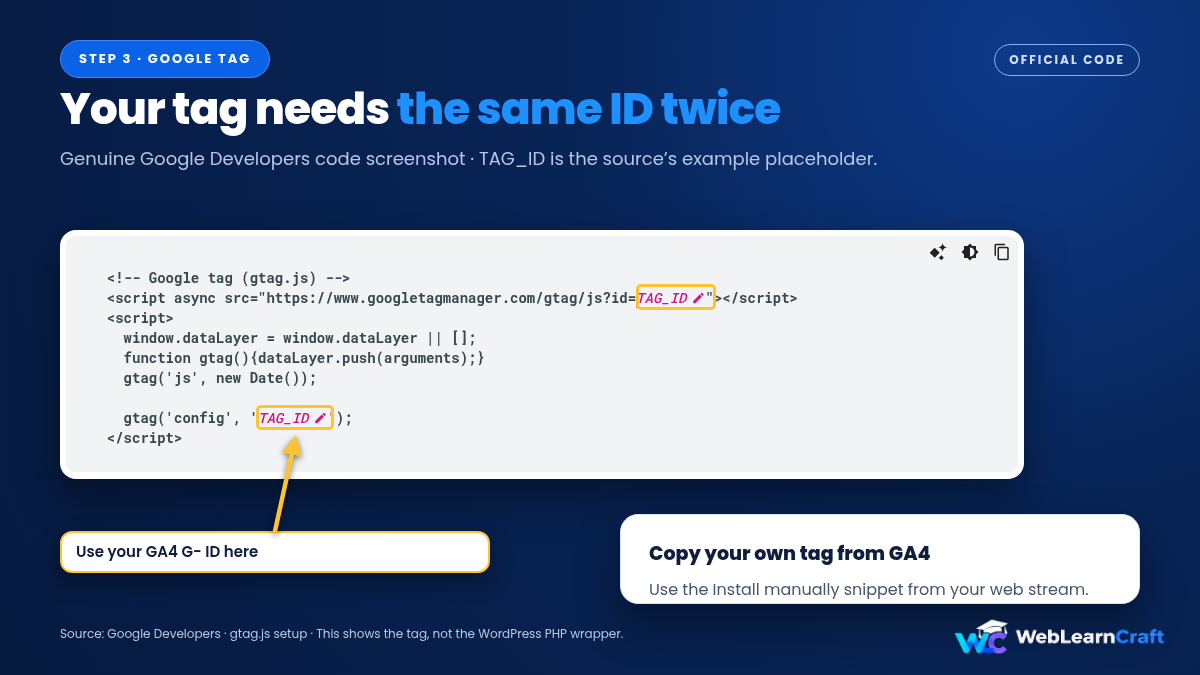
While you’re on that page, click View tag instructions, then choose Install manually. Google shows you a snippet that begins with a comment saying “Google tag (gtag.js)”. That’s the code we need. It contains your Measurement ID twice.
Don’t paste it anywhere yet. First, a quick tour of where it should go.
Step 3: Add the Google Tag to WordPress
The tag needs to sit in the <head> of every page. In WordPress, one approach is a small function in your child theme’s functions.php that prints the code using the wp_head hook. It’s neater than editing header.php, and it survives parent-theme updates.
Open your child theme’s functions.php through File Manager or FTP, and add this at the bottom, while still inside its PHP section. Don’t add another opening <?php tag if PHP is already open. Replace both copies of G-XXXXXXXXXX with your own Measurement ID:
add_action( 'wp_head', 'wlc_add_ga4_tag', 1 );

function wlc_add_ga4_tag() {
    ?>
    <!-- Google tag (gtag.js) -->
    <script async src="https://www.googletagmanager.com/gtag/js?id=G-XXXXXXXXXX"></script>
    <script>
      window.dataLayer = window.dataLayer || [];
      function gtag(){dataLayer.push(arguments);}
      gtag('js', new Date());
      gtag('config', 'G-XXXXXXXXXX');
    </script>
    <?php
}
Save the file. That adds the tag. If your site requires prior consent, don’t deploy this unconditional snippet by itself—connect the tag to your consent setup first.
A tip: copy the snippet from Google itself rather than retyping it. If Google’s version differs from mine (they update it sometimes), use theirs, and just wrap it in the function. The idea stays the same.
Using Elementor or Another Builder?
Some themes and page builders have their own custom code or header scripts box. If yours does, that can save you from editing PHP files. Availability may depend on your builder’s version or plan. Check its settings before touching any files, and use only one installation method.
Block Theme?
Block themes use HTML templates rather than a traditional PHP header template, but the wp_head method in a child theme’s functions.php still works. If you don’t have a child theme, a built-in header scripts field or Google’s Site Kit may be easier.
Step 4: Test It
Never assume. Check.
Open your site in a private browser window, and not while logged in as an admin (you’ll see why in a moment). If your site asks for Analytics consent, make your choice before testing. Click around a few pages. Then go back to Google Analytics and open Reports, then Realtime. You should normally see activity shortly afterward, although processing and your privacy settings can affect the result.

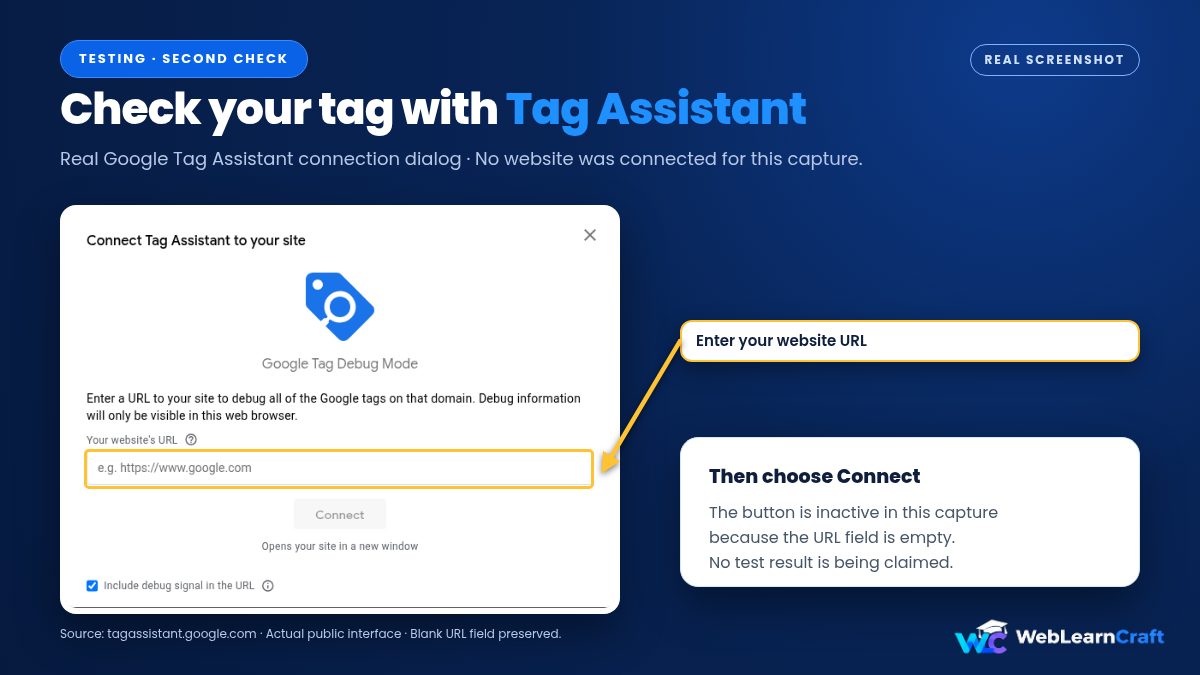
Want a second opinion? Google’s Tag Assistant can help check whether the tag is sending data. Or view your page source (right-click, View Page Source) and search for your Measurement ID. Finding it confirms the snippet is present, but doesn’t by itself prove that the script loaded or sent an event.
Seeing nothing? Hold on, give it a minute, then check again. Realtime is quick, but the rest of GA4’s reports can take hours to fill in, so don’t panic if your standard reports are empty for a while.
Skip Your Own Visits
Here’s a small problem. When you visit your own site, GA4 counts you. On a small blog, that can mess up your numbers badly.
One fix is to stop the tag from loading for logged-in admins. Add this line at the start of your function, right after function wlc_add_ga4_tag() {:
if ( is_user_logged_in() && current_user_can( 'manage_options' ) ) {
    return;
}
Now the function skips the tag when you’re signed in as an admin. But it also means you can’t test that installation while logged in, so use a private window. If a cache serves the same saved HTML to both logged-in and logged-out visitors, this PHP check may not behave as expected; check how your cache handles logged-in users.
Google Analytics also has its own internal-traffic filters, if you prefer to do it on that side. Those identify internal traffic using IP rules, not your WordPress login. Define the rule first, then test the filter before making it active.

A Quick Word on Privacy
Analytics collects data about visitors, and many countries have rules about that. If you have readers in places like the EU or UK, prior consent may be required for Analytics tracking. Where it is required, showing a notice alone isn’t enough: your implementation needs to respect the visitor’s choice.
Your privacy policy should explain that you use Google Analytics and what it does. If you use Consent Mode, remember that it isn’t a consent banner by itself, and basic and advanced implementations behave differently.
I’m not a lawyer, so check the rules that apply to you. The point is simply: don’t treat tracking as something invisible. Mention it.

When It Doesn’t Work
Go through these in order.
Nothing in Realtime
Did you test while logged in as an admin, with the exclusion above? Try a private window. Also check the Measurement ID: one wrong character and the data may not reach the stream you’re checking. Consent choices and browser blocking can also affect the test.
The ID Is in the Code but Nothing Shows
Clear your caching plugin, your host cache and your browser. A cached page may not have the new code yet. Then use Tag Assistant to check whether the tag actually loads and sends events; an ID appearing in page source isn’t proof of successful collection.
A White Screen After Saving
There may be a PHP error in your functions.php, often a missing bracket or quote. If the dashboard still opens, reactivate the parent theme while you investigate. Otherwise, use File Manager or FTP to restore the last working child functions.php, then check the host’s error log for the failing line.
Don’t rely on renaming the child theme folder to recover automatically.
Numbers Look Doubled
You may have installed tracking in two places, such as your theme and a plugin. Pick one installation method and remove the duplicate. The same Measurement ID normally appears twice inside one standard Google tag snippet, so two text matches alone don’t prove duplication. Check for separate installations or repeated events in Tag Assistant.
It Stopped Working After a Theme Update
You may have added the code to the parent theme instead of a child theme. Restore it in the child, then check that you haven’t left another installation active elsewhere.
Data Looks Low
Ad blockers and cookie-consent tools can stop the tag from loading or limit collection for some visitors. GA4 numbers are a guide, not a perfect count.
Mistakes to Skip
- Pasting the tag into your parent theme. An update can delete it.
- Skipping the backup. One missing bracket, one broken site.
- Adding the tag twice. Pick one method.
- Testing while logged in with the admin exclusion on. You’ll see nothing and think it’s broken.
- Forgetting privacy. Mention Analytics in your policy, and implement consent handling where it’s required.
- Obsessing over Realtime. It’s for testing. The useful numbers come from the other reports over days and weeks.
Frequently Asked Questions
Can I add Google Analytics 4 to WordPress without a plugin?
Yes. Copy the Google tag from your GA4 data stream and print it in your site’s head using the wp_head hook in a child theme, or paste it into your theme or builder’s custom code field. Use only one method and connect it to any required consent setup.
Where do I find my GA4 Measurement ID?
In Google Analytics, go to Admin, then Data streams, and open your web stream. The ID starts with G- and appears in the stream details.
Where should the Google tag go?
In the head of every page you want to measure, subject to your consent setup. In WordPress, the wp_head hook in your child theme’s functions.php lets you add it without editing header.php.
How do I know the tag is working?
Open your site in a private window, make any required consent choice, and check Realtime in Google Analytics. Use Tag Assistant for another check. Seeing the Measurement ID in page source only confirms that the snippet is present.
Why do I see nothing in my reports?
Realtime updates quickly, but standard reports can take hours. Also check the Measurement ID, clear your caches, and make sure you’re not testing while excluded as an admin. Consent settings and blockers can prevent collection too.
Do I need a child theme?
Use one if you’re adding the PHP method shown here. Code added directly to the parent theme can disappear on update. A theme-independent custom-code field is another option if your site provides one.
Do I need a cookie banner?
It depends on the rules that apply to your site and visitors. Where prior consent is required, a banner must be connected to the tracking implementation so the visitor’s choice is respected. Check the applicable requirements rather than treating a notice or Consent Mode alone as proof of compliance.
Final Thoughts
Adding GA4 without a plugin isn’t hard. Create a property and a web data stream, copy your Measurement ID and the Google tag, add the code to your child theme with the wp_head hook, and test in a private window.
Keep a backup, keep the tag in one place only, and explain Analytics in your privacy policy. Connect any required consent handling before tracking visitors. After that, give it a few days, and you’ll finally see which of your posts people actually read.
For more beginner guides, browse the WebLearnCraft blog. Need help with your site? Contact us and we’ll point you the right way.